Princess Bot
- About Princess Bot
- Bot Command Formatting Guide
- Reminder Management and Automatic Notifications
- Seen Tracking and User Presence Checking
- Ticketing
- Welcome Channel Cleanup
About Princess Bot

Princess Bot is the core control bot in use on CCC's servers. It performs a number of important tasks to maintain and manage the server.
What is Princess Bot?
Princess is an instance of Red Discord Bot an open source bot. It runs currently under docker on a box located at Underestimated's House.
How does Princess Bot Work?
Princess bot uses plug in functions called 'Cogs' to provide different functions and tools. It has fun and utility functions all in the same place.
We interact with the bot primarily via ! commands, which tell the bot we're talking to it specifically. However some functions also use / commands, which also give you a little guide when writing them, so that you know you're giving it the info it needs.
What does CCC use the Princess Bot for?
We use it for many things but in short we have
Utility:
- Ticketing and Support Requests (Including feedback and Question of the Day)
- Welcome channel cleanup (Autodeletes messages)
- Seen Tracking and User Presence checking
- Reminder Management and Automatic Notifications
- Temp Roles
- Channel Cleaner
- Birthday Roles and Announcer (not enabled yet)
Useful:
- Website Down Checking
- Embed Creator
- Emoji Stealer and Uploader
- Custom Commands and Responses
- Automatic Reactions
- Mention Checker
- Unit Converters
- Button Polls
Fun:
- Starboard
- Bot Says Game
- Citation Generator
- Hangman
- Monopoly
- Performative Reactions
- Plant Tycoon
- Tic-Tac-Toe
- Wordle
Potential Planned Future Functions:
- Automod Replacement (Still working that out)
- Mod Sanctioning System (Replacing Dyno)
- Welcomer (Swapping from Dyno)
- Mod logger and Activity Tracker (Replacing Dyno)
How do I check if the bot is working OK? (Mods)
The bot is reliant on a steady internet connection at Under's location right now, this may change in the future but to keep costs down we're running it on existing hardware. If the bot is offline there may be a connection problem. Firstly if you can visit this site, the server is running OK, this runs on the same box. If the bot is offline and this site is reachable ping @Underestimated37 to let him know, and he'll check. You can also issue the command !uptime to get a message telling you how long the bot's been awake. Note that while you can run some commands in a DM with the bot, some server specific stuff needs you to run the command from on the server. Mods can use the #bot-spam channel for admin commands, and regular members have the #poke-the-bot channel for public safe commands.
Bot Command Formatting Guide
When you read through this wiki, you will see many examples of commands you may need/want to enter.
These follow a fairly simple syntax but if you're not aware of it you may end up entering in stuff that the bot has no idea on how to handle.
This quick guide will help you understand how we document commands.
Data You Need To Input
Following standard computing terminology, we will document commands that need information from you with a descriptive insert into the command example. These are referred to in standard terminology as arguments.
These will be encased in special bracket characters such as [ ] < >
When you see these characters, you don't actually want to enter them into the command. Instead, you will need to replace that whole segment including the brackets with a response.
Brackets that are written as [ ] are optional you do not need to fill these out for the command to execute correctly.
However brackets written as < > are absolutely required. The command will not execute unless these are met.
For example,
The command for a ticket embed is documented as follows:!tickets embed [colour] [channel] <title> <description>
and if you were to enter that you would need to fill out the arguments with something like this.!tickets embed 012356235234 Hello Hello and Welcome
In the example we have ignored the colour option as it's optional, and filled out the channel title and description.
Some commands like this one determine the next argument by spaces, and if you need to add a space (Say to the title) you just enclose that argument in double quotes.!tickets embed 012356235234 "Hello There!" Hello and Welcome
This can be inconsistent though, so on our documentation we will explicitly tell you when you need to use double quotes.
Reminder Management and Automatic Notifications
The reminders cog by AAA3A Cogs is an incredibly powerful and flexible tool we can use for many different functions.
The bot can be programmed to say a message on a recurring time schedule, it can remind you privately about things you need to remember, it can trigger bot commands for you on repeat, and even produce discord timestamps for you.
NOTE: There is a problem with the base /remind command. Despite it being listed as a function, only use it with a subcommand such as /remind say or /remindme |
|---|
Before Using the Commands
Before you first use any command, you need to configure your timezone. You only ever do this once, and then the bot will remember it forever.
Simply enter /reminder timezone and discord should pop up a list of timezones for you. Find the one that is closest to you and select it, then send the command.
This will ensure that the bot operates in the correct timezone for you at all times.
Time Parsing Tips
Direct from the bot, you can get these by issuing the command /reminder timetips
Bot Tips
Time Parsing Tips
Allowed absolutes are:
• eoy - Remind at end of year at 17:00.
• eom - Remind at end of month at 17:00.
• eow - Remind at end of working week (or next friday) at 17:00.
• eod - Remind at end of day at 17:00.Allowed intervals are:
• years/year/y
• months/month/mo
• weeks/week/w
• days/day/d
• hours/hour/hrs/hr/h
• minutes/minute/mins/min/mYou can combine relative intervals like this:
• [in] 1y 1mo 2 days, and -5h
• on 29th may at 18h, and every yearTimestamps and iso-timestamps are supported:
• For ISO, be aware that specifying a timezone will ignore your timezone.Dates are supported, you can try different formats:
• 5 jul, 5th july, july 5
• 23 sept at 3pm, 23 sept at 15:00
• 2030
• [at] 10pm
• friday at 9h
Note: the parser uses day-first and year-last (01/02/03 -> 1st February 2003).Cron triggers are supported:
• Check https://crontab.guru/.
Unders Tips
You can get a simple repeat out of the bot by using the word every i.e. you want a reminder at 11am Sunday? You write 11am Sunday but if you want it 11am every Sunday you write 11am every sunday
List out your reminders
| Command | /reminder list |
|---|
A simple function that will list out all your active reminders. It will give you the reminder ID number as well so that you can edit your reminder.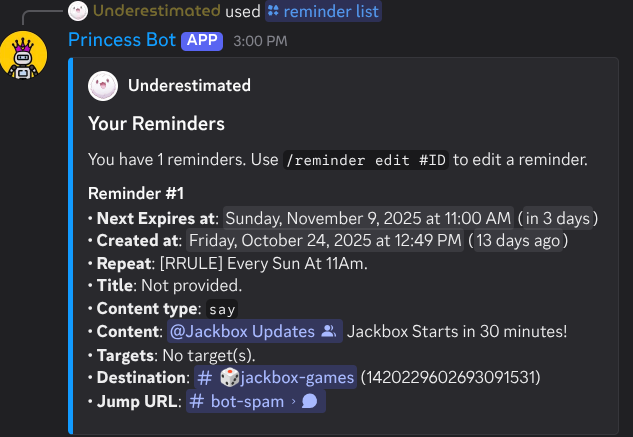

Have the bot send a message at a specific time
| Command | /reminder say time:<time> text:<message> destination:[Channel] |
|---|
Use the slash command for this and click each prompt, it's much simpler than typing the fields yourself
This is the most important function of the reminder tool. It can be set so that the bot can say a message at a specific time and if needed in a specific channel. With the right syntax, you can set up recurring reminders at specific times to send messages or ping specific roles (like reminding members about Trivia)
A quick guide on setting up a recurring reminder with /reminder say
The command to create a reminder that sends a message in a channel is/reminder say
Discord will instruct you on what to add.
- Write the time relative to you, for example 11am Every Sunday.
- Then press message and enter what you want the bot to say. You can @ groups and people like normal, because it's a slash command they won't get a notification when you make it.
- Once your message is right press destination and pick the channel it will go to.
- Send the message, a confirmation will appear.

 A fully configured /reminder say command for pinging a role to remind them of the Jackbox Games Event

Confirmation of the reminder being set
Should you need, you can edit the reminder and its repeat from here.
Edit an existing reminder
| Command | /reminder edit <Reminder ID> |
|---|
It's easier to do this after generating a list of your reminders, so do that first.
Once you have this list, you can enter the /reminder edit command and specify the number of the ID you want to edit.
Once you send that you'll get a response like this: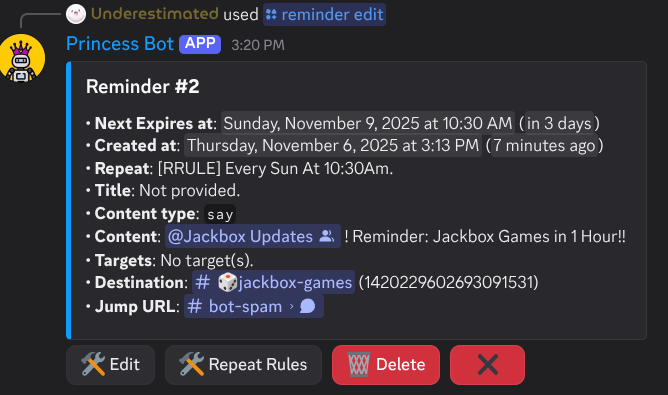

You can use the buttons under the reminder to adjust it's settings, add repeat rules and edit its behaviour. These are all fairly intuitive so I won't go into depth on these here.
Seen Tracking and User Presence Checking
We use a combination of commands for Seen Tracking and Presence checking.
This way we have verification of what is happening and where people are on the server.
Each section will explain a specific command we have.
Last Seen / lseen
| Command format | !lseen <userid, username or mention>BCFG |
|---|
lseen (last seen) is cog by Fox-V3 Cogs.
It has a single simple use which is to determine when a user last was seen on the server. They don't have to chat to be seen by this particular cog, it tracks actual online status in realtime and reports it back when requested.
seen
Note: use / commands for this function, as there are multiple fields and the in discord dialog helps you pick the right ones
| Command format BCFG | Command does |
|---|---|
/seen member [show_details] <member> |
looks up member |
/seen board ["members" "roles" "channels" "categories" "guilds" "users"=members] |
Shows a Seen Board with Members |
/seen hackmember <user> |
Check when a old member was last active! (you can substitute member for user in this command) |
Many of the functions here have extended uses which have been omitted to keep the table clean
seen is a cog by AAA3A Cogs which has a far more complex data set and functions. Because it takes more information and has more complex uses we use this primarily as a backup when lseen isn't working well.
Ticketing
| PLEASE NOTE: Ticketing functions are permission locked to Admins and Mods, with some of the advanced config only changable by Admin users |
|---|
Ticketing is built on the Tickets cog from VRT-Cogs which has a number of useful functions that made it ideal for our use case.
- Multiple Categories (it uses the term 'Panels' to refer to these)
- Dynamic, in discord forms for the member to fill out (no needing to remember commands or visit external websites)
- Custom Questions on Forms
- Native in-discord management of ticket requests (no external web interface or DM's needed)
- History Retention and Accountability (You'd be shocked but most bots ask for payment for that function!)
- Custom Responses on Ticket Opening, and Reason Tracking on Closure
- Nice friendly Welcome Messages with users only needing to click a button to submit a ticket.
- Minimal Disruption to regular channel structure (everthing is in a thread in our set up, and they self hide as well as disappear once closed)
| Note that you will need channel and message ID's to perform some of the commands here, and thus your Discord client needs to be in Developer Mode. Documentation on how to do that is here |
|---|
Creating a Channel for a Ticket Panel
In order to add another panel to the server, we need to create a channel for the tickets to nest under.
We have a few rules to follow though;
- Users cannot message the Top Level Channel, but can view it's Messages and Message History.
- Bots must be given permissions to create and delete both threads and private threads.
- Admins and Mods must be able to message and view private threads (Should already be active)
Conventions I have established for the server include as well that these channels should sit under Server Contacts in the sidebar, Embeds should have a thumbnail, and one panel per channel.
Before you start, send a square icon in PNG format (preferrably with a transparent background, ask Under for help if you need that) to the bot spam channel. This is going to be your thumbnail. Copy the Media Link for the picture (Right Click or Press and Hold) and store it somewhere safe for later.
Create the channel we want in the Server Contacts category, give it a nice simple name.
Permissions are 🚫 Deny, / Inherit, and ✅ Allow
Permissions for Everyone
| Permission Name | Setting |
|---|---|
| View Channel | Allow |
| Manage Channel | Deny |
| Manage Permissions | Deny |
| Manage Webhooks | Deny |
| Create Invite | Deny |
| Send Messages | Deny |
| Send Messages In Threads | Allow |
| Create Public Threads | Deny |
| Create Private Threads | Deny |
| Embed Links | Allow |
| Attach Files | Allow |
| Add Reactions | Allow |
| Use External Emoji | Allow |
| Use External Stickers | Allow |
| Mention @everyone etc etc. | Deny |
| Manage Messages | Deny |
| Pin Messages | Deny |
| Manage Threads | Deny |
| Read Message History | Allow |
| Send Text to Speech Messages | Deny |
| Send Voice Messages | Deny |
| Create Polls | Deny |
| Use Application Commands | Allow |
| Use Activities | Deny |
| Use External Apps | Deny |
Permissions for Bots
We're giving the bots a ton of power here, but only for these threads, I don't fully understand all the permissions but this is the combo that makes it run
| Permission Name | Setting |
|---|---|
| View Channel | Allow |
| Manage Channel | Allow |
| Manage Permissions | Allow |
| Manage Webhooks | Allow |
| Create Invite | Allow |
| Send Messages | Allow |
| Send Messages In Threads | Allow |
| Create Public Threads SUPER IMPORTANT | Allow |
| Create Private Threads SUPER IMPORTANT | Allow |
| Embed Links | Allow |
| Attach Files | Allow |
| Add Reactions | Allow |
| Use External Emoji | Allow |
| Use External Stickers | Allow |
| Mention @everyone etc etc. | Allow |
| Manage Messages | Allow |
| Pin Messages | Allow |
| Manage Threads SUPER IMPORTANT | Allow |
| Read Message History SUPER IMPORTANT | Allow |
| Send Text to Speech Messages | Inherit |
| Send Voice Messages | Inherit |
| Create Polls | Inherit |
| Use Application Commands | Allow |
| Use Activities | Inherit |
| Use External Apps | Inherit |
Permissions for Moderators
Basically the same as the bots.
| Permission Name | Setting |
|---|---|
| View Channel | Allow |
| Manage Channel | Allow |
| Manage Permissions | Allow |
| Manage Webhooks | Allow |
| Create Invite | Allow |
| Send Messages | Allow |
| Send Messages In Threads | Allow |
| Create Public Threads SUPER IMPORTANT | Allow |
| Create Private Threads SUPER IMPORTANT | Allow |
| Embed Links | Allow |
| Attach Files | Allow |
| Add Reactions | Allow |
| Use External Emoji | Allow |
| Use External Stickers | Allow |
| Mention @everyone etc etc. | Allow |
| Manage Messages | Allow |
| Pin Messages | Allow |
| Manage Threads SUPER IMPORTANT | Allow |
| Read Message History SUPER IMPORTANT | Allow |
| Send Text to Speech Messages | Inherit |
| Send Voice Messages | Inherit |
| Create Polls | Inherit |
| Use Application Commands | Allow |
| Use Activities | Inherit |
| Use External Apps | Inherit |
Now once this is all set up, you'll want to write a nice welcome message. but it needs to be sent in an embed by the bot, Pop up to #bot-spam and issue a command.!tickets embed [colour] [channel] <title> <description> Bot Command Formatting Guide
This has a couple parts
| Section | What to enter | Required? |
|---|---|---|
| Colour | Name of a colour | No, and I'd recommend not using it |
| Channel | The ID of the channel you created (remember you get this from discord developer mode being on, and you right clicking the channel, and selecting Copy ID) | No, but for this case, YES |
| Title | Now this needs to be formatted specifically, Put the title between Double Quotes "like so" or part of it will shift over to the main message and make a mess | YES |
| Description |
The Message you want to show, in this DO NOT use double quotes for the text or it will put those in the message. The description can be Multi-Line |
YES |
Once you have completed and submitted the command, you will be asked a few questions by the bot.
- Firstly it will ask you if you want a footer, press No
- Then it will ask if you want a thumbnail, press Yes
- It will ask for a URL, paste the link you copied waaaay back at the start of this process into the message box and hit enter (or send)
- It will then ask you if you want to include an image, press No
- And finally it will ask if you want to include a field, Press No
It'll have a think for a minute, then it will generate the embed and send it to the right channel, and you'll have your channel all set up to be fully integrated into a ticket panel!
Welcome Channel Cleanup
We use the Deleter Cog by Toxic Cogs to keep the Welcome Channel clean.
Welcome messages are (currently) generated by Dyno bot and sent to the Welcome Channel to welcome members and give them a rundown of how the server operates. These messages by default do not have an expiry, and as such stick around in the channel they're sent.
We use the Deleter cog to automatically wipe these messages after 1 Hour.
| The Deleter cog should not be used on any other channel! It deletes indiscriminately and will remove any and all messages after they're sent. |
|---|
The basic command structure of the deleter command is !deleter channel <channel> <wait> BCFG
The Specific command we use is !deleter channel 1412423813643112580 1h
There may be about an approximate 10 second difference between the wait and the actual time the message is deleted, due to rate limiting and cooldowns.
Wait times must be greater than or equal to 5 seconds, or 0 to disable auto-timed deletion. If you would like to use time specifications other than seconds, suffix the wait argument with one below:
s => seconds (ex. 5s => 5 seconds)
m => minutes (ex. 5m => 5 minutes)
h => hours (ex. 5h => 5 hours)
d => days (ex. 5d => 5 days)
w => weeks (ex. 5w => 5 weeks